
Almost everyone loves mangoes. Mango Tres Leches Cake made with fresh, sweet mangoes instantly becomes more irresistible. From creamy desserts to refreshing drinks, mango season is always full of delicious treats.
One day, while I was scrolling through Instagram Reels, a video of a beautiful mango cake popped up. The moment I saw it, I couldn’t stop thinking about it and instantly wanted a slice. But, to be honest, my budget was pretty tight at the time, so I was trying hard to ignore all my dessert cravings.
At the same time, I had been wanting to try a classic Tres Leches Cake for ages. That’s when an idea struck me, why not combine both desserts into one? Instead of choosing between a mango cake and a three-milk cake, I decided to create my own Mango Tres Leches Cake.
Mango Tres Leches Cake Is Different From Other Cakes
Mango Tres Leches Cake is different in a few specific ways. First, I use a combination of fresh mango puree blended into the milk soak itself, not just mango on top as decoration. This means the mango flavor runs through every single bite, not just the garnish.
Second, I add a small amount of mango juice reduction to the whipped cream topping, which sounds like an extra step but takes five minutes and makes the topping taste like mango instead of just plain sweetened cream.
Third and this is something I learned the hard way the sponge here is made using the separated egg method (whipping egg whites separately) rather than a simple all-in-one mix. This gives the cake a much lighter, more open crumb, which soaks up the milk mixture far more evenly
Chef Bisma’s Personal Experience about Tres Leches Cake
My first attempt, though, didn’t go quite as planned. I poured the entire milk mixture onto the cake all at once, straight out of the oven, while it was still hot. The cake basically dissolved into a soggy mess in the middle while the edges stayed dry. I remember standing over the pan feeling pretty defeated, wondering where I’d gone wrong.
The second time around, I let the cake cool completely before poking holes and pouring the milk mixture in slowly, in two separate additions, letting the first round soak in before adding the second. That single change fixed almost everything. The cake held its shape, stayed light, and soaked evenly from edge to edge.
Secret Hacks for Perfect Tres Leches Cake
Speed Hacks
- Bake the sponge a day ahead and keep it covered at room temperature.
- Use a stand mixer or hand mixer for the egg whites.
Budget Hacks
- A basic evaporated milk and condensed milk combination from any grocery store works fine. You don’t need a premium or imported brand for this recipe.
- Skip decorative piped whipped cream borders if you’re short on a piping bag. A simple offset spatula swirl looks just as elegant and saves you buying equipment.
Flavor Hacks
- Add a small pinch of salt to the milk soak mixture.
- Reduce a quarter cup of mango juice on the stove until syrupy and fold it into your whipped cream topping for a stronger mango flavor without adding extra liquid.
- A tiny squeeze of lime juice into the mango puree brightens the whole cake.
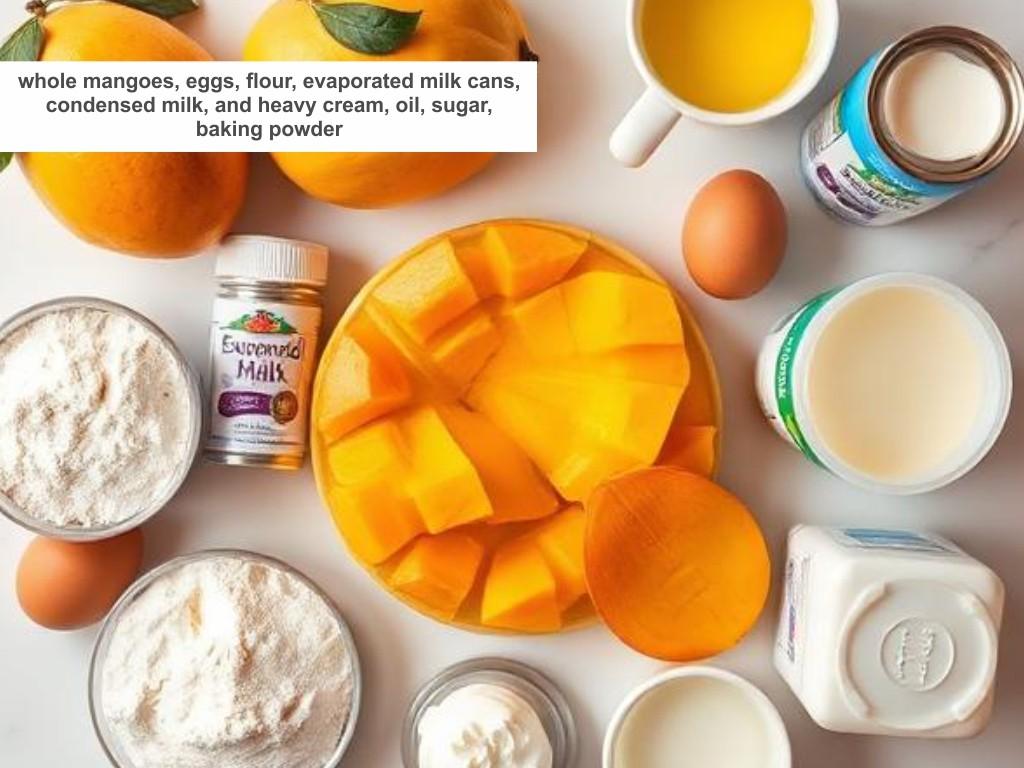
You’ll need ingredients for this recipe
For the Mango Sponge Cake
| Ingredient | Quantity |
| All-purpose flour | 1 cup (125g) |
| Baking powder | 1 teaspoon |
| Salt | 1/4 teaspoon |
| Eggs, separated | 5 large |
| Granulated sugar | 3/4 cup (150g), divided |
| Whole milk | 1/3 cup (80ml) |
| Vanilla extract | 1 teaspoon |
For the Mango Milk Soak
| Ingredient | Quantity |
| Fresh ripe mango puree | 1 cup (about 2 medium mangoes) |
| Evaporated milk | 1 can (12oz / 354ml) |
| Sweetened condensed milk | 1 can (14oz / 396g) |
| Heavy cream | 1/2 cup (120ml) |
| Lime juice | 1 teaspoon |
For Mango Whipped Topping
| Ingredient | Quantity |
| Heavy whipping cream | 1 1/2 cups (360ml), cold |
| Powdered sugar | 3 tablespoons |
| Mango juice, reduced | 1/4 cup fresh mango juice, reduced to about 2 tablespoons |
| Fresh diced mango | 1 cup, for garnish |
Tools Required For Making Cake
9×13-inch baking pan
Hand mixer or stand mixer
Fine mesh sieve
Skewer or fork
Blender
Large mixing bowls
Step-by-Step Recipe Instructions
Step 1: Prepare the pan and oven
Preheat your oven to 350°F (175°C). Grease a 9×13-inch baking pan and line the bottom with parchment paper. This takes about 5 minutes.
Step 2: Whisk the dry ingredients
In a medium bowl, whisk together the flour, baking powder, and salt. Set aside. This takes about 2 minutes.
Chef’s tip: Whisking (instead of sifting) is enough here since we’re using standard flour, not cake flour with lumps.
Step 3: Whip the egg yolks
In a large bowl, beat the egg yolks with half the sugar (about 6 tablespoons) until the mixture turns pale yellow and thickens slightly, roughly 3 to 4 minutes. Add the milk and vanilla and mix until combined.
Common mistake: Under-beating the yolks results in a denser sponge with less lift.
Step 4: Whip the egg whites
In a separate, completely clean and dry bowl, beat the egg whites on medium speed until foamy, then gradually add the remaining sugar while continuing to beat until stiff, glossy peaks form. This takes about 5 to 6 minutes.
Step 5: Combine the batter
Gently fold the dry ingredients into the yolk mixture until just combined. Then fold in about a third of the whipped egg whites to lighten the batter, followed by the rest, folding gently to keep as much air as possible. This takes about 4 to 5 minutes.
- Visual cue: The batter should look light, airy, and pale, with no streaks of egg white remaining, but still visibly fluffy.
- Common mistake: Overmixing at this stage deflates the egg whites and results in a flat, dense cake.
- Chef’s tip: Use a spatula and a folding motion, cutting through the center and turning the bowl, rather than stirring in circles.
Step 6: Bake the sponge
Pour the batter into the prepared pan and smooth the top gently. Bake for 25 to 30 minutes.
- Visual cue: The cake is done when it springs back lightly when touched and a toothpick inserted in the center comes out clean.
- Common mistake: Opening the oven door too early can cause the sponge to sink in the middle.
- Chef’s tip: Check at the 25-minute mark, since oven temperatures vary, and every few minutes after that.
Step 7: Cool completely
Let the cake cool in the pan on a wire rack for at least 1 hour, until it reaches room temperature.
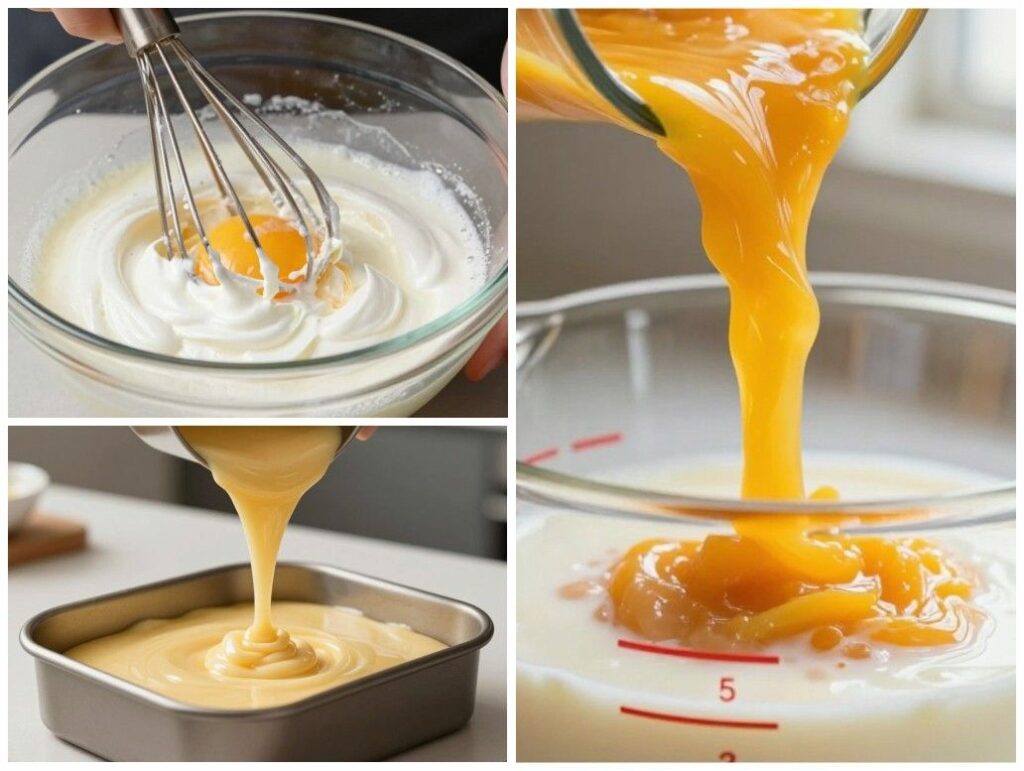
Step 8: Make the mango milk soak
Blend the mango into a smooth puree and strain through a fine-mesh sieve to remove fibres. In a bowl or large measuring jug, whisk together the mango puree, evaporated milk, condensed milk, heavy cream, and lime juice until fully combined. This takes about 8 minutes total.
- Visual cue: The mixture should be smooth, pourable, and a soft pale orange colour.
- Common mistake: Skipping the straining step can leave stringy mango fibres throughout the soak, which affects texture.
- Chef’s tip: Taste the soak before pouring, it should taste distinctly of mango, not just sweet milk.
Step 9: Poke and soak the cake
Once completely cool, poke holes all over the cake using a skewer, spacing them about an inch apart. Slowly pour half the milk mixture evenly over the cake, letting it absorb for about 10 minutes, then pour the remaining mixture over the top.
- Visual cue: The milk should visibly sink into the holes rather than pooling excessively on top.
- Common mistake: Pouring all the milk at once often causes uneven soaking, with some parts oversaturated and others left dry.
- Chef’s tip: Pour slowly and in a circular motion, working from the edges toward the center, so the whole cake soaks evenly.
Step 10: Chill the cake
Cover the pan and refrigerate for at least 4 hours, though overnight is best. This is largely hands-off time.
- Visual cue: The cake should feel cold and slightly firm, with the milk fully absorbed and no liquid pooling on top.
- Common mistake: Serving too early means the cake won’t have had time to fully absorb the soak, leaving it less flavorful.
- Chef’s tip: Overnight chilling genuinely makes a noticeable difference in flavor, it’s worth the wait if you can plan ahead.
Step 11: Whip the mango topping
In a chilled bowl, whip the heavy cream with powdered sugar until soft peaks form, about 3 to 4 minutes. Fold in the cooled, reduced mango juice until just combined.
- Visual cue: The cream should hold a soft peak that gently droops at the tip, not a stiff, dry peak.
- Common mistake: Overwhipping the cream at this stage can cause it to turn grainy or split.
- Chef’s tip: Stop whipping just before you think it’s ready — it firms up slightly more once spread.
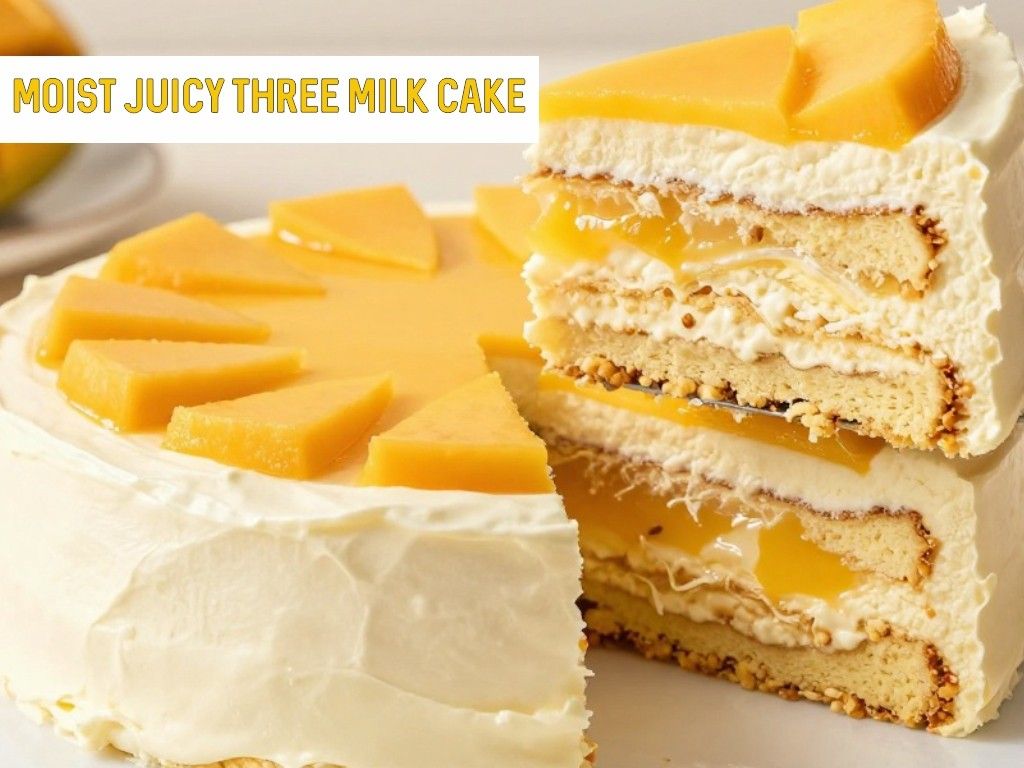
Step 12: Assemble and garnish
Spread the whipped mango cream evenly over the chilled cake. Top with fresh diced mango just before serving. This takes about 5 minutes.
- Common mistake: Adding the fresh mango garnish too early can cause it to release juice and make the topping watery.
- Chef’s tip: Slice the cake with a sharp knife dipped in warm water for the cleanest pieces.
Nutrition Information (Per Serving)
| Nutrient | Amount |
| Calories | ~310 kcal |
| Protein | 6g |
| Carbohydrates | 38g |
| Fat | 15g |
| Fiber | 1g |
| Sugar | 32g |
| Sodium | 115mg |
Storage and Reheating Guide
Refrigerator: Store the cake covered tightly with plastic wrap or in an airtight container in the refrigerator for up to 4 days. Because of the milk soak and cream topping, it should never be left at room temperature for more than an hour or two.
Freezer: You can freeze the soaked cake (without the whipped cream topping) for up to 1 month. Wrap tightly in plastic wrap and then foil. Thaw overnight in the refrigerator before adding the topping and garnish.
Reheating: This cake is meant to be served cold, so reheating isn’t necessary or recommended. Simply remove it from the fridge about 10 minutes before serving for the best texture.
Shelf life: Best enjoyed within 3 to 4 days of making, though the flavor is honestly at its peak on day one and two, once the milk has fully settled into the sponge.
Frequently Asked Questions (FAQs)
Can I use canned mango pulp instead of fresh mango?
Yes, canned mango pulp works as a substitute.
Why did my cake turn out too soggy?
Make sure the cake is completely cool before poking holes, and pour slowly, letting the first half absorb before adding the rest.
Can I make this cake ahead of time for a party?
Absolutely, and honestly it’s better made ahead.
Is it necessary to strain the mango puree?
Yes, straining removes any fibrous strands that some mango varieties have, which otherwise get caught in the poked holes and prevent even soaking.
Why is my whipped cream topping runny?
Because the cream wasn’t cold enough when whipping, or the mango reduction was added while still warm.
Final Thoughts
If you take away one thing from this recipe, let it be this: patience with the soaking and chilling time is what separates a good tres leches cake from a truly great one. I know it’s tempting to cut corners when something smells this good, but trust me, the wait is worth it.
This mango version has become a permanent fixture in my kitchen every summer, and I genuinely believe it’s one of those recipes that makes people ask for it again the moment they’ve finished their first slice. Give it a try, adjust it to your own taste as you get comfortable with it, and don’t be afraid to make it your own the way I did. Happy baking, and I hope this one becomes a favorite in your home too.
Happy cooking! — Chef Bisma
Recipes that You’ll Love too: